How to Add a New Appointment Session

Creating Calendar Sessions #

Prerequisites #

  1. Added an inbox on Peasy here
  2. Google Calendar is connected to Peasy. Click here to learn more.
  3. Admin access. Agents won’t be able to create sessions
  4. Three approved template messages (one for the confirmation message and the other for the reminder message). Here are some useful template message macros you can use for your messages:
    1. {{meeting.location}}. This will translate to the Google Meet link or if a location is selected, the location.
    2. {{meeting.title}}. The title of the meeting (i.e. Demo Session with Company X).
    3. {{meeting.friendly_tune}}. The time of the meeting.

For Web #

These are the instructions for adding new appointment session on Peasy Sales web application.

1. Login to your Peasy sales account here.

2. Once you’ve logged in, click on the “Appointment” with a calendar icon on the left side of the window.

3. Once clicked, by default, you are in the Session screen interface, as shown above.

4. Click on “Add Calendar Session” on the top right corner to begin.

5. A pop up window will appear with multiple fields to be filled in for the calendar session, as shown above:

  1. Enter your Your meeting name/title here.
  2. Enter your meeting description/instructions here.
  3. Enter your unique schedule link here. Ensure to use a unique word combination if you’re creating more than 1 calendar session on Peasy.
  4. Buffer time indicates the space between each of your meeting slots. If your buffer time is 15 mins, you will have 15 mins between each meeting. Maximum buffer time is no more than or same as a day (1,439 mins).
  5. Duration indicates the length of each meeting. The maximum meeting duration is no more than a day (1,440 mins).
  6. If your max allowed meetings per day is 5, there will only be 5 meeting slots available per day in your calendar session.
  7. Notice time indicates how long a meeting can be booked in advance. If your notice time is 120 mins, your meetings have to be booked at least 2 hours in advance.
  8. Meeting reminder time indicates how long before a meeting will your client/attendee receive the reminder message. If it’s set to 15 mins, your client/attendee will receive the reminder message 15 mins prior to the meeting.
  9. Please ensure that the correct inbox is selected (i.e. WhatsApp) to trigger the confirmation and reminder messages successfully. A template message has to be used. Type “/” to trigger the list of template messages.
  10. Confirmation message refers to the message sent to your client/attendee upon booking your meeting. A template message has to be used. Type “/” to trigger the list of template messages.
  11. Reminder message refers to the message reminding your client/attendee prior to the meeting.
  12. Cancel message refers to the message sent to confirm your client/attendee meeting cancellation.
  13. Please ensure that the correct time zone is selected according to your Google Calendar’s time zone.
  14. Use the downward arrow, Select Custom as per in picture for physical meeting.
    1. No Google Meet link will be generated when selecting a “Custom” conference type
    2. Selecting Google Meet will generate Google Meet links for your meeting.
  15. Select the color tagging for your booked meeting slot. Once click on the colored box, a color slider popup will appear for you to choose the color.
  16. Input the full address of the custom location for the physical meeting. This will be reflected in the Google Calendar invite to your client/attendee.
  17. Select your intended business days & hours according to your own ability. Take note that this will take your conflicting calendars into account.
  18. Select “Create” to complete. In the case of updating a calendar session, the button will be “Update” instead of “Create”.

For App #

These are the instructions for adding new appointment session on Peasy Sales mobile application.

1. Log in to your Peasy Sales application.

2. Click “Profile”.

3. Click “Calendar”

4. Click on the “+” symbol on the top right of the mobile screen interface.

5. Click on each of the empty boxes and fill in the information accordingly. Refer below picture.

a) Meeting Title and description

b) Insert the name of the appointment session.

c) Insert the value for the time gap (in minutes) in between the appointment sessions.

6. Click on the empty boxes and fill in accordingly. Refer below picture:

a) Insert the outgoing confirmation message to customers once they have selected the appointment session.

b) Insert the outgoing reminder message to customers regarding their upcoming appointment session.

7. Fill in the information accordingly as below. Refer below picture:

a)  Choose the existing inbox from the drop down list. Click on the downward arrow and choose the existing inbox.

b) Insert your business hours information. Click on the “Add Hours” button.

8. Click “Save”. Refer below picture:

9. You have successfully created an appointment session when you can see the appointment session name under the calendar section as shown below:

How to send the appointment session link on App to your customers? #

1. Ensure that you are in the Calendar screen interface on your Peasy Sales application.

2. Click on the three dots icon located on the right corner as shown in image below.

3. Select the customer’s platform to share the link and Click “Send”.

How to copy the appointment session link on App? #

You can copy the appointment session link by clicking on the rectangle icon in the top right corner, as shown in the image:

Common Errors #

1. I can't create a Calendar Session: #

  1. Inbox hasn’t been added: Please make sure that you have added an inbox to your Peasy Without it, the Calendar Session cannot be created successfully.
  2. You don’t have admin access: Ensure that you have the necessary administrative privileges to create a Calendar Session. Admin access is required for this task.
  3. Your Google calendar is not connected: Verify that your Google calendar is properly connected to Peasy. Without a connected Google calendar, the creation of the Calendar Session will not be possible.

2. The recipient didn't receive my reminder and confirmation messages: #

  1. Insufficient credits in the inbox: Check if you have enough credits in your inbox. Sufficient credits are required to send reminder/confirmation messages. If your credit balance is low, consider topping up to ensure successful message delivery.
  2. Ensure that you’ve used a WhatsApp approved template message: Only approved template messages can be sent successfully.

3. There are no slots in my appointment link/calendar: #

  1. Check your availability on your primary and conflicting calendar(s): Review your availability settings on both your primary calendar and any conflicting calendars. Peasy will only display vacant time slots.
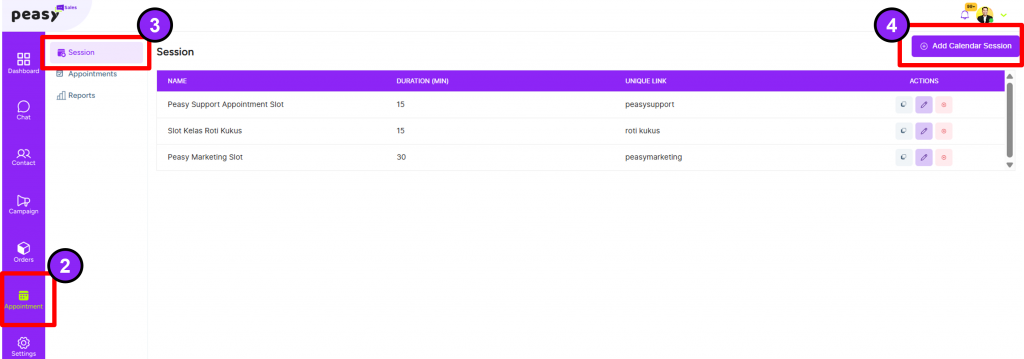
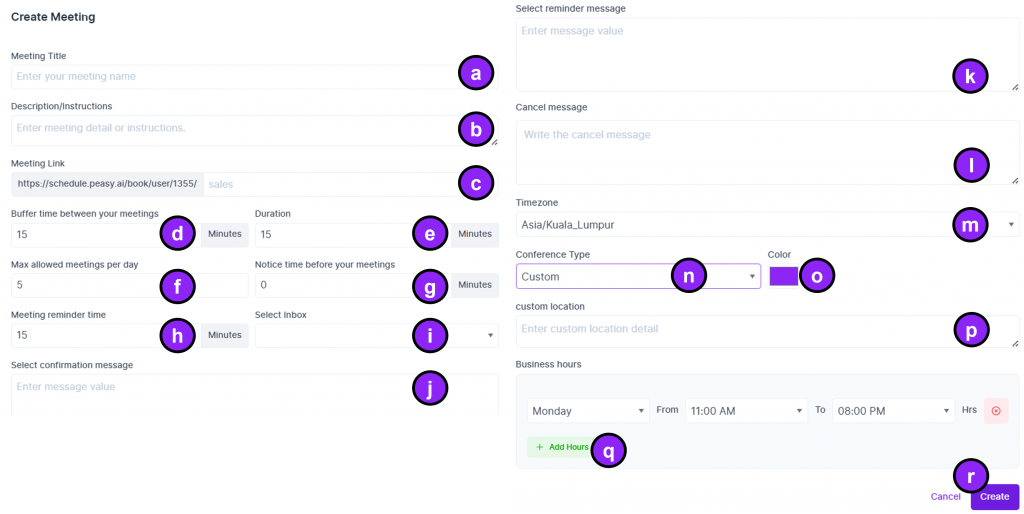
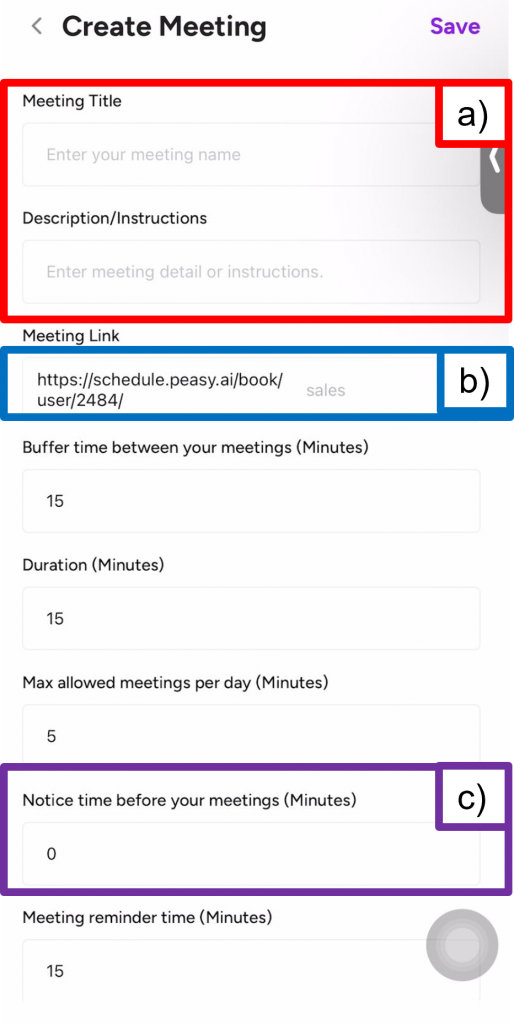
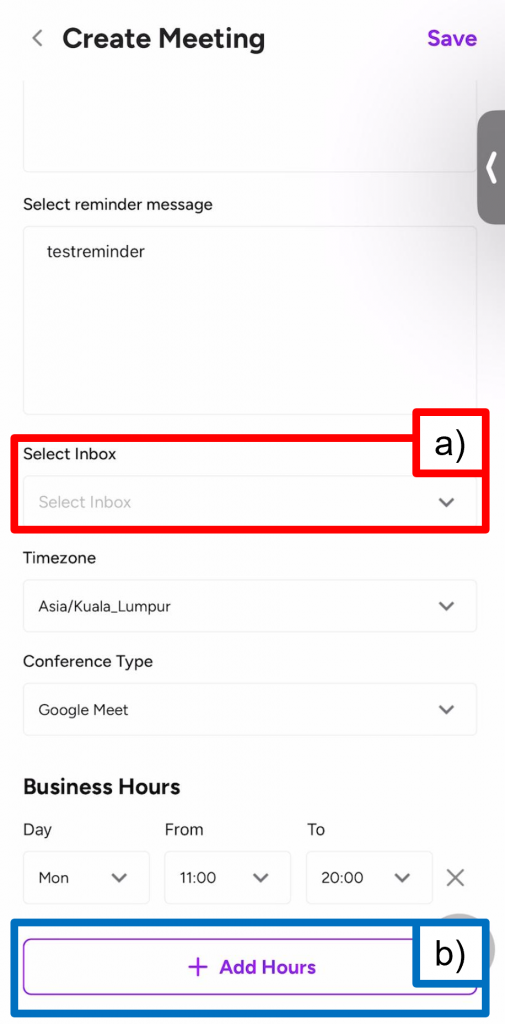
  2. Check if your business days & hours are input correctly when creating the Calendar Session: Verify that you have accurately entered your business days and hours when setting up the Calendar Session. Incorrect input may result in the absence of available time slots.
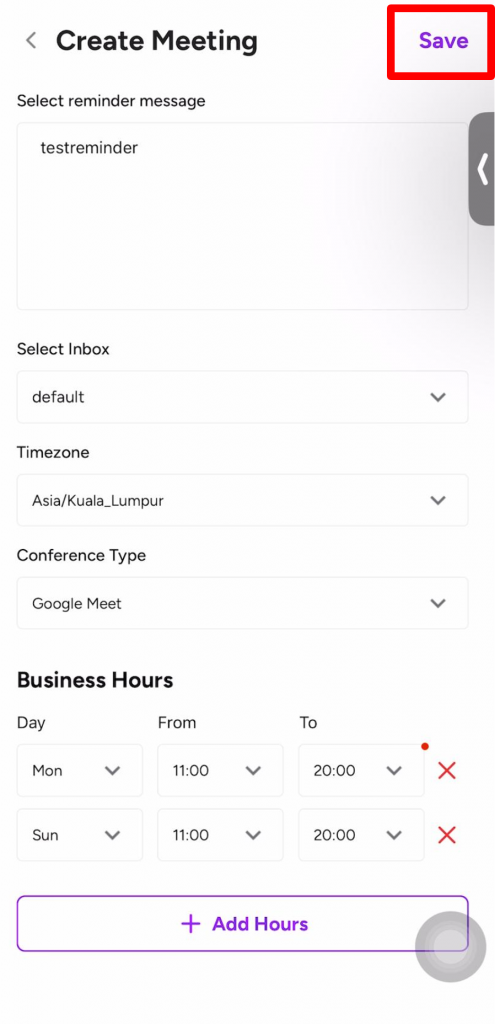
  3. Check for overlapping/repeated days when setting up the Calendar Session. See example below:
Did you find this article to be helpful?
Updated on May 28, 2025