Creating and Editing Chatbots

How to create a new chatbot #

  1. Click on the Campaign icon on the left menu.
  2. Click on “Chatbot Flow” in the expanded Campaign sub-menu. A list of existing chatbots will appear.
  3. Click on “Create New Flow”. A pop-up will appear.
  4. Key in your chatbot name. Ensure that there are no space in the name.
  5. If you wish to build from a template, select one. Otherwise, select “Empty” from the template menu.
  6. Click “Create”. Your chatbot is now inside the Chatbot list. There will be additional characters appended onto your specified chatbot name.
  7. Click on your chatbot. You will be redirected to the chatbot studio.
  8. Create your chatbot using the combination of different node.
  9. When you are ready, click on the “Save” button. A “Bot Exported” message will appear to indicate that your chatbot has been successfully saved.
  10. Make sure your chatbot is associated with an automation trigger. Otherwise the bot will not triggered

Cardinal rules when creating a chatbot #

  1. A node’s start-point can have multiple incoming connection, but each endpoint can be connected to only 1 node.
  2. Name your nodes, it will be easier when performing future maintenance.
  3. When a conversation is delegated to a chatbot, the conversation status is automatically set to “Pending”. Pending conversations are hidden from human agents by default.
  4. Create an action with “End Flow” option turned on. Make sure every flow in your chatbot lead to this action. End flow will automatically set the conversation status back to Open.
  5. Create a condition node immediately after the start. Use the condition node as a gate-keeper to prevent bot interruption during human agent conversation, and also to prevent unnecessary node traversing which can lead to additional charges to your prepaid credit.
  6. Be mindful of session. When your recipient answer past the session duration, you do not want a dumb bot which repeat the whole line of questioning again. Use contact attributes to persist where they last stop, build flows that will check that said attribute so the conversation can proceed smoothly.

How to test my chatbot? #

  1. Create an automation to trigger the chatbot. Make sure that the automation ‘s condition filter out any non-user. For example, set the tester email as a condition.
  2. Test your chatbot with the tester identity.

Which inbox can I deploy my chatbot? #

Your chatbot can be deployed on these inbox types:

  1. WhatsApp
  2. Communal WhatsApp
  3. Facebook Messenger
  4. Web Livechat

What are templates? #

To help expedite your chatbot development, we have created a few templates that you can base your chatbot on. If you select a template when creating a chatbot, your studio comes pre-loaded with a fully-functioning flow which you can customize. We will continue to add new templates, do keep a lookout!

What are content nodes? #

Content nodes is use when you want your chatbot to say something. Our chatbot support 6 different content formats, but do bear in mind – not all content formats can be used across all channels.

You can stack multiple contents within a single node. For example:

this node will send out 3 different message; a text, image and lastly; another text.

  1. Text content. Standard text messages. Unicode characters, so you can use multi-lingual scripts. Character limit is channel dependent. Therefore, please ensure that your message length does not exceed the lowest-base. If you like to send a longer message, you can always break your message into multiple text contents.
  2. Image content. JPG or PNG file. Maximum allowable size is 12MB. Images can be further furnished with a text label. However, not all inbox types support text labels. You have the option of either uploading the file directly to your bot OR provide the URL where the image is hosted. Your account has a monthly throttle limit, download speed will be downgraded when you have exceeded your limit. If you anticipate heavy usage for your chatbot, we recommend that you host your images on a file server and share the image URL in the node. 
  3. Video content. MP4 (recommended), AVI or 3GP. AVI and 3GP might not be supported universally. Maximum allowable size is 12MB. Videos can be further furnished with a text label. However, not all inbox types support text labels. You have the option of either uploading the video directly to your bot OR provide the URL where the video is hosted. Your account has a monthly throttle limit, download speed will be downgraded when you have exceeded your limit. If you anticipate heavy usage for your chatbot, we recommend that you host your videos on a file server and share the video URL in the node. 
  4. File content. Any file format below 12MB. However, not all file format can be sent across on some inbox types. Universally accepted file formats are PDF, MP3 and AMR. You can further furnish the file with a text label, but once again – not all inbox types support text labels. If you want a send a dynamically generated file; you can key in the file URL instead of uploading the file. If you anticipate heavy usage for your chatbot, we recommend that you host your file on a file server and share the file URL in the node. 
  5. Carousel content. A collection of cards. Not supported in all inbox types.

Card Content #

Image/Video/PDF
Add Your Tooltip Text Here
Title/Label
Add Your Tooltip Text Here
Description
Add Your Tooltip Text Here
Interactive Buttons
Add Your Tooltip Text Here
  1. Attachment. Can be a image, video or PDF
  2. Title. 24 characters.
  3. Description. 1,024 characters
  4. Interactive buttons. You can add up to 3 buttons. Button labels cannot exceed 20 characters. Supported button types are: Quick Reply (clicking on the button will reproduce a text response (if you have more than 1 Quick Reply buttons, each button must have an unique button label)), URL (clicking on the button will direct the recipient to an URL).


How to add dynamic content into my messages? #

You can personalize your content with contact attributes, session variables, last response or API response. Just add dynamic scripts along with your text content.

Type Script Example
Contact Attributes
{{session.lead.attributes}} to access standard attributes such as email, name and phone_number. {{session.lead.custom_attributes.attributes}} to access custom attributes values.
Hi {{session.lead.name}}, will you want me to call {{session.lead.phone_number}} after 5pm {{session.lead.custom_attributes.timezone}}
Session variables
{{session.variable}}
This is your {{temp.search_count}} attempt
API Response
{{temp.response.header.attribute}} to access the header and {{temp.response.body.attribute}} to access the body
Fail to retrieve catalog because of {{temp.response.header.code}} error code due to {{temp.response.body.message}}
User's last response
{{event.payload.text}}
You mentioned your email address is {{event.payload.text}}?

What if I want the bot to pause and wait for the recipient's response? #

Tick on the “Wait for user message” checkbox in the content node. The chatbot flow will stop at this node, until it receives a response from the recipient.

However, if your recipient respond past the session duration – the flow will restart from the starting point again.

What are condition nodes? #

Condition nodes allow you to embed logic onto your chatbot. You can create a really dynamic chatbot using condition nodes combined with action and content nodes.

Each condition within a condition node can lead to a separate flow. The “Otherwise “condition is created by default, and can be used a catch-all when all other conditions fail. Conditions are evaluated in the order they are created, so if a scenario fulfill multiple conditions, the chatbot’s flow will go with the first passing condition.

Supported condition types includes:

  1. Response. Create logical evaluation based on the recipient’s response. For example, if the recipient said “yes” then do this.
  2. Label. Create logical evaluation based on the contact’s label. For example, if the contact have label X, then do this.
  3. Contact Attributes. Create logical evaluation based on the contact’s standard or custom attributes. For example, if the contact attribute X is greater than 100, then do this.
  4. Event name. If the event which trigger this chatbot fulfill certain logical evaluation.
  5. Event params. If the params of the event which trigger this chatbot fulfill certain logical evaluation.
  6. Variable. If a specific session variable fulfill certain logical evaluation, then do this.
  7. API Response. To be used in conjunction with an API node. Evaluate the API response from a successful API invocation.
  8. Raw Response. Essentially, conditions are pure logic operators expressed in Javascript. If you find the existing logical operators to be insufficient, and you’re quite well-verse in Javascript – use the Raw Expression condition to create your own logical operators.


What are API nodes? #

You can perform external integration or obtain external data for your chatbot using the API node. Example usage of API node includes:

  • Invoking external calendar API to create a reservation
  • Obtaining catalog data from API to create a product recommendation carousel
HTTP Type

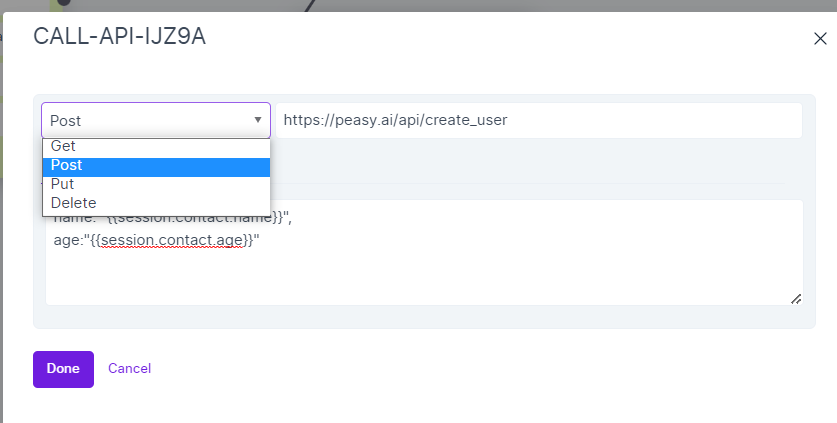
Support GET, POST, PUT and DELETE

API URL
Body & Header

In JSON format. You can use dynamic scripts to furnish the parameter values.

API nodes has 2 endpoints:

  • On success. When the API invocation returns 200
  • On failure. When the API invocation return anything other 200 nodes.

Your API must provide response in JSON format. To access the response’s header; use temp.response.header.json_parameter_name. To access the response’s body, use temp.response.body.json_parameter_name.


What are action nodes? #

Action nodes allow you to persist data within the contact OR within the session scope. Some of supported actions includes:

  • Set contact attributes
  • Set a session variable
  • Add or Remove a conversation label
  • Change a conversation status
  • Execute a raw Javascript

What is the end-flow option? #

When the flow reaches an action node has the end-flow option activated, it will:

  • Reset the session memory 
  • Reset the conversation status from Pending back to Open. The conversation will be handover to human agent.

What is a session? #

A session is created whenever the chatbot engages with a recipient. Each session have isolated memory that help the chatbot remembers the session variable and the flow continuity. 

A session duration last for 24 hours from the last received message. When a session expire, Peasy will reset all session variables and flow continuity for that session. So, if your recipient replies after 24 hours – they would restart the entire conversation from the starting point.

The inbox identifier is used as session ID. For example, the recipient’s phone number is used as session ID for a WhatsApp conversation and while cookie ID will be used as session ID in a live chat conversation. Therefore, sessions from the same individual but different inboxes are not inter-shareable.

How can I use session variable? #

  1. You can create and update session variable using action nodes.
  2. You can use session variables in conditions or content node. For example, {{temp.variable_name}} will allow you to access the value of a stored session variable.
Did you find this article to be helpful?
Updated on October 5, 2022

Sign up for Peasy

Just enter your email and password to start using Peasy for free! We will re-direct you to our login page as soon as you are registered.

[fluentform id="5"]

Apply for the BSN SME Digitization Grant

Get RM2,000 worth of FB Ad Credits and 1 year subscription of Peasy Gold Free

[fluentform id="3"]