
- Head on over to https://developer.facebook.com
- Click on “Create App”. You will see a screen similar to the image below.

- Select Other and click “Next”. You will see a screen similar to the image below.

- Select “Business” and click “Next”. You will see a screen similar to the image below.

- Type in your App name. You can type in your company name, this App will not be visible to the public. Key in your email. IMPORTANT: Please select the Business Account that owns your Facebook Page (and Catalog if you have one), and make sure you have admin access to the Business Account. Click “Create App” when you’re ready. You should be directed to a screen similar to the image below.

- Look for “WhatsApp” card and click on the “Set up” button. You should see a screen similar to the image below.

- That’s it, you’ve created your WhatsApp Business App. Now you’re ready for the next step.
- Continuing from the earlier step; from your Facebook Developer screen – click on the “Start using the API” button similar to the image below.

- A screen similar to the image below will appear. Scroll down and click on the “Add Phone Number” button.

- A pop-up form will appear. Fill in your Profile Display Name (what your contact will see as your name on their WhatsApp, we recommend using your Company/Product name), timezone, category and business description (both will be visible on your public WhatsApp profile, but don’t worry – you can always edit them later). Click “Next” when you are ready.

- Key in your phone number and choose your preferred validation method. Click “Next” when you are ready.

- If this error message appears after you had clicked “Next”, either deactivate your existing WhatsApp account or use a different phone number.

- Otherwise, a screen similar to the image below will appear. Please key in the OTP code sent by Meta via your selected verification method.

- You will be directed to the screen similar to the image below once your phone number is registered. Your WhatsApp account is now ready for usage, let’s proceed to the next step.
You’ll be paying Meta directly for your WhatsApp API conversation charges. Meta will charge you once your usage exceed your credit limit. To setup payment method for your WhatsApp Cloud, please follow these steps:
- From your Facebook Developer App screen, please click on the “Add payment method” button.

- You will be directed to a screen similar to the image below. Click on the “Payment Settings” button.

- You will be directed to a screen similar to the image below. Click on the “Add Payment Method” button.

- After clicking on the “Add Payment Method”, select your currency (MYR is not supported at this point in time) in the popup form and click “Next”
- Choose your payment method and click “Next”
- Continue until your payment method is added. Your payment method should appear in the Payment Settings screen similar to the image below.

- Hooray! You’re now ready for the next step.
Please ensure that you’ve created your Facebook App, added your phone number and payment method BEFORE engaging in this step.
- Head on over to your Facebook Business Account settings. If you don’t remember your Account URL, select your Business Account from https://business.facebook.com/settings. Please select the same Business Account associated to your Facebook App and WhatsApp API.
- In your Business Account Settings, select User -> System User.

- If you do not have an existing System User, click on the “Add” button to create a new System User. Make sure that you grant “Admin” and not “Employee” access to the System User.
- Click on the “Add assets” button within the inner window panel. A popup will appear, select the app you have just created, and checked the “Manage App” permission to assign full admin access to the system user.
- Click on the “Generate new token” button. Select the Facebook Developer App you have just created on step 1, the popup will expand.
- Select “Never” in your token expiration. Otherwise, we will have to repeat this step every 60 days.
- Scroll down and checked on both “whatsapp_business_management” and “whatsapp_business_messaging” checkboxes.
- Click on the blue “Generate token” button at the bottom of the popup.
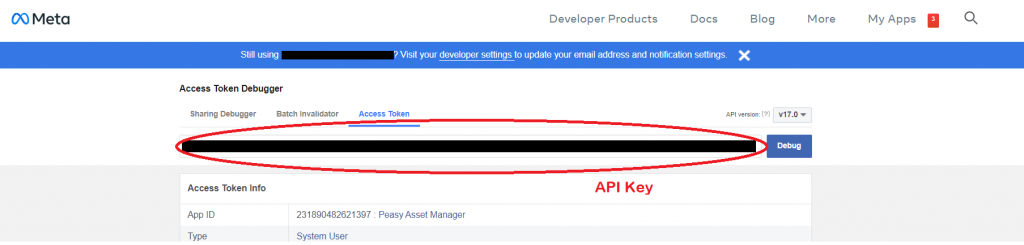
- Meta will generate an access token, similar to the image below. Click on the link, you will be redirected to a new tab on your browser.
- Copy the access token from the new tab (similar to the image below). This is your API KEY. Copy and save the API KEY, you will be using this to create your WhatsApp Inbox in Peasy
Before creating the inbox, we will need to prepare these:
| Values | Source |
| API Key | The system user’s access token generated in the previous step. Get this from your Facebook Business Settings |
| WhatsApp Phone Number | The phone number you had used to register a new WhatsApp account in step 2 |
| WhatsApp Phone ID | From your Facebook Developer App that you have created in step 1 |
| WhatsApp Business Account ID | From your Facebook Developer App that you have created in step 1 |
| Webhook Verify Token | Create a password (without any space character), we will reuse it the next step. |
- Login to your Peasy Sales account as Admin
- Click on Settings->Inbox
- Click on “Add Inbox” in the Inbox list screen
- Select “WhatsApp” from the list of channel cards.
- A form will appear. Select “WhatsApp Cloud” as your API Provider.

- Assign any name you like as the inbox name. The inbox name is not visible to your contact, it is only visible internally.
- Key in your phone number into the “Phone number” field. Make sure to append “+” and country code onto your phone number.
- Key in the WhatsApp Phone ID into the “Phone number ID” field. Make sure the values are copied accurately, without any additional space.
- Key in the WhatsApp Business Account ID into the “Business Account ID” field. Make sure the values are copied accurately, without any additional space.
- Key in the API Key into the “API key” field. Make sure the values are copied accurately, without any additional space.
- Key your Webhook Verify Token. We recommend that you note down the same password, we will need to key in the exact same value later in the next step.
- Head on over to the https://developer.facebook.com and select the App which you have created on Step 1
- From the left menu, select WhatsApp->API Setup. You should see a screen similar to the image below.

- Select your phone number, and copy the generated WhatsApp Phone and Business Account ID from the same screen.
- Head on over to the https://developer.facebook.com and select the App which you have created on Step 1
- From the left menu, select WhatsApp->Configuration. You should see a screen similar to the image below.

- Click on the Edit button. A popup similar to the image below will appear.

- Key in “https://chat.peasy.ai/webhooks/whatsapp/<<your WhatsApp phone number>>” into the Callback URL field. For example, if your WhatsApp phone number is +60121005000, then please key in https://chat.peasy.ai/webhooks/whatsapp/+60121005000
- Key in the webhook verify token you have set in step 5 into the Verify Token field
- Click on “Verify and Save”. If your inbox was created with exact same webhook verify token, you should see the webhook registered successfully similar to the image below. Otherwise, please double check your verify token value.

- Next, let’s configure the webhook fields. Click on the “Manage” button similar to the image above. Tick on the “message_template_status_update” and “messages” checkboxes and click “Done”.
- That’s it! Congrats, you have now link Peasy to your WhatsApp Cloud account. Now you’re ready to test your connection setup.


