How to create a WhatApp E-Commerce system under 3 minutes #
How to add a product into my online store? #

1. Set up my product’s image #
A clear, high-quality product image can increase conversions and help customers make confident purchase decisions. Click here to learn more how to upload your menu image.
✅ Best Practice |
Use clear, high-resolution images taken in good lighting. |
Upload real photos so customers know exactly what they’re buying. |
Ensure every product has an image for a professional, uniform look. |
Show different angles and include a size reference (e.g., next to a common object or with dimensions listed). |
2. Write my product description so that I can encourage organic customers. #
A well-written product description helps customers make faster decisions, reduces hesitation, and increases sales. In fact, businesses that use SEO-friendly descriptions see 25% more organic traffic because their products appear higher in Google search results.
Click here to learn more how to key in your description.
Best Practice |
✅ Be descriptive: “Elegant black leather handbag with gold-tone hardware. Designed for everyday use with a spacious zippered compartment for essentials. Adjustable strap for crossbody or shoulder wear.” |
✅ Use keywords naturally: Instead of “Handbag”, use “Women’s leather handbag with gold chain – Stylish & spacious” |
✅ Include important specs: – Size & Dimensions: (e.g., 30cm x 25cm x 12cm) – Material & Durability: (e.g., Vegan leather, waterproof coating) – Best Use Case: (e.g., Fits 13” laptop, perfect for work & travel) – Unique Features: (e.g., RFID-blocking, detachable strap, hidden pockets) |
✅ Make it scannable: – Use bullet points – Bold important details – Keep sentences short and engaging |
✅ Encourage immediate action: – “Over 10,000 happy customers!” – “Limited stock – Order now before it’s gone!” |
3. Set up my menu price #
If you’re selling a fixed product, for example – a T-shirt. Then set the T-shirt price.
But if you’re selling a variable product, for example a Custom Gift Box, then set your base price to RM X (for example your Custom Gift Box is RM20, key in 20.00), and additional gifts as your variant.
Peasy allows you to change your price with ease and flexibility. Adopting a dynamic pricing strategy can help improve your retail business’s profitability, click here to learn more about dynamic pricing strategy.
4. Configure the dimensions of your product packaging for DELIVERY #
Enter your packaging dimensions for seamless delivery!
Click on each separate column to key in the details for weight, height, width and length.
In the case where your business do not provide delivery services, you can put any value on the weight column, such as 0.1 kg
5. Set up the inventory #
Update your product inventory based on the availability of your stock.
Ensure that your inventory level is always above 0, otherwise the menu item will not appear on your menu
6. Add-on and combo using product variant #
Does your store sell product bundles (example: Gift Box with Mug and Candle) or allow customers to customize their own combo (example: Gift Box + Keychain + Chocolates)?
You can key in variants as below. For example:
Gift Box as your main item – RM 20.00
Add Variant 1 – Gift Box + Mug – RM 30.00
Click here to learn more how to upload your variant. For tips regarding variants, click here.
7. Setup my product category #
For example, I want to sell a Custom Gift Box. I need to create a category for my product named, “Gift Box”. My configurations will be as below:
- Click the downward arrow at the “Select Category” box.
- Click “+Add Category” to add Category.
- Type in “Gift Box” as your Category Name.
- Select “Hobby & Leisure” from existing list, as your Main Category.
- Select “Hobbies and Gifts” from existing list, as your Sub Category.
- Click “Add”
- Click “Save”
If I have another similar product, for example “Birthday Gift Box”, I don’t have to create a new category again. I can just reuse the “Gift Box” created previously.
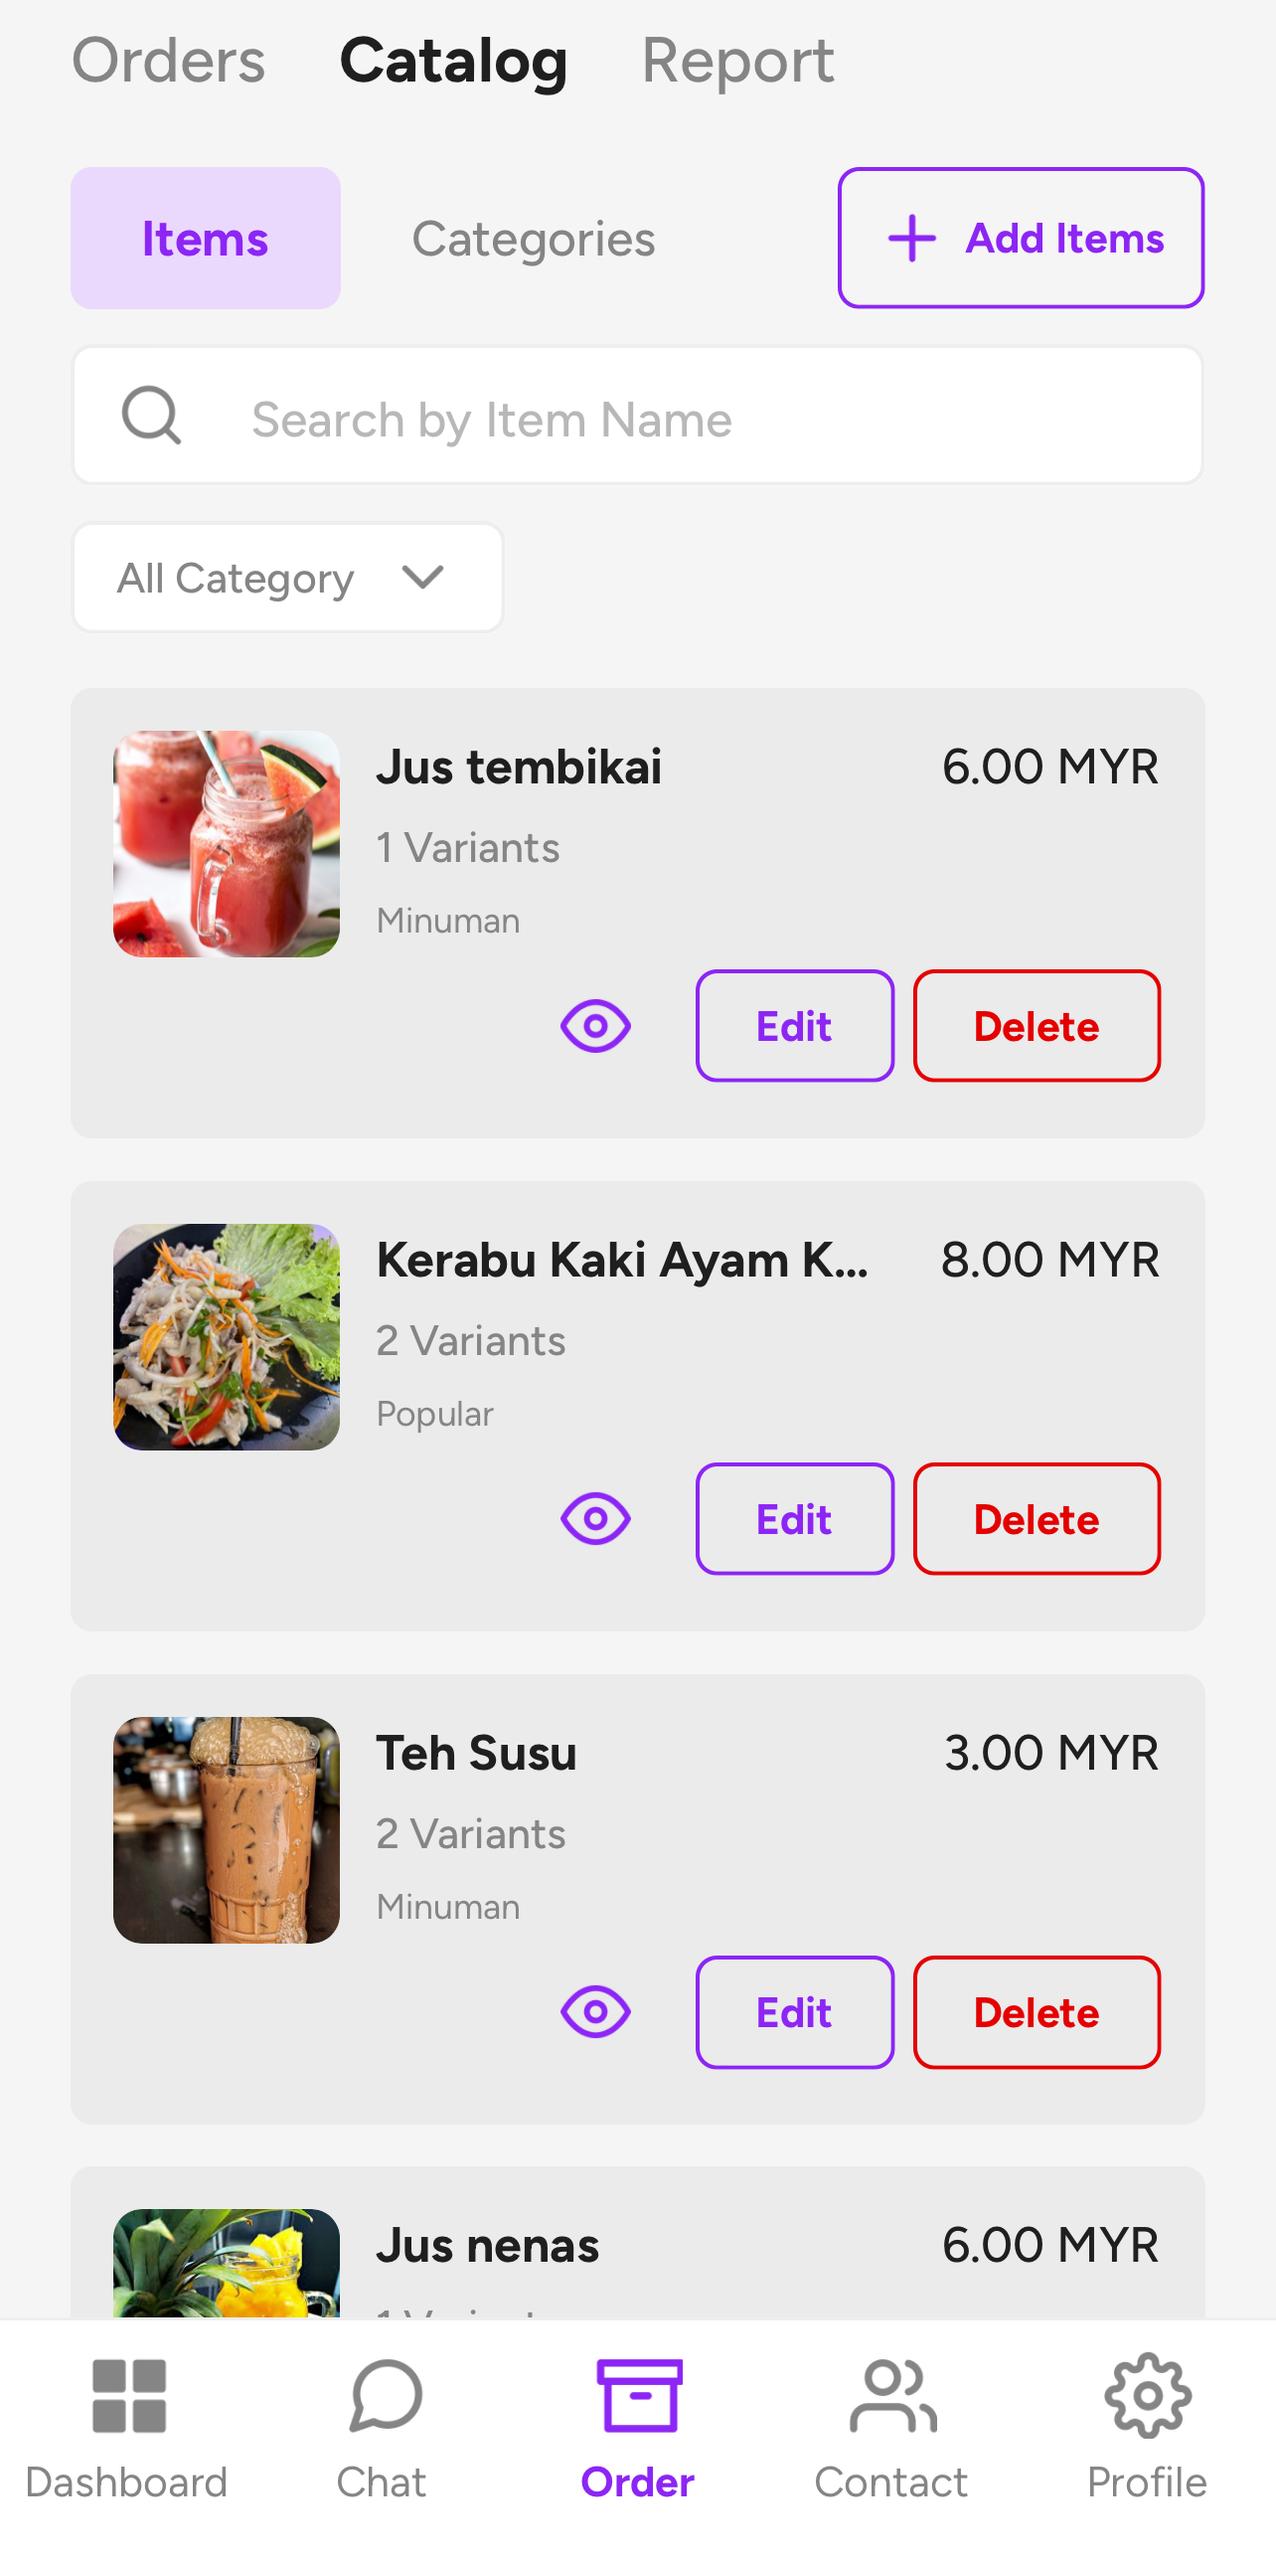
How to check if your catalog item is added correctly? #
You have successfully added your item when your item appear in your Catalog Item List as shown below.
Once the item appears in the list, it’s visible to your customers.
Proceed with shop setting steps below to access your online store web. You should see your added item on your online store’s screen.
How to configure my online catalog to fit my retail shop’s operation? #
How to personalise my online catalog’s look and feel? #
1. Upload my shop's logo #
Place your company logo. Keep the file size below 2mb so that it will be faster for your customers to view your picture and less drop out.
Click here to learn more how to upload your shop logo.
2. Write a description of your shop #
Write a description of your shop by incorporating relevant keyword. If you aren’t sure, use chatgpt to help you with better descriptions and keywords.
Click here to learn more how to write your shop description.
3. Set up my shop location #
- Click Auto locate button, a map will appear.
- Search for your location and pinpoint the location. Once finished, click “Add Location”
- Check the address that’s automatically prefilled. Rectify any mistake

4. Configure for delivery service for my shop #
Pre-requisite for delivery service: #
- Shop’s Address
- Sufficient Peasy account’s credit balance
- Turn on the “Allow Delivery” function. Click the left side toggle until toggle turns purple
Delivery service set up: #
Let’s just say my store is at Bukit Bintang in Kuala Lumpur, and I offer same-day delivery for special items like gift boxes that include perishable goods such as chocolates. These items are best delivered within 30 minutes to ensure they remain fresh and presentable. Based on the traffic around Bukit Bintang, 30 minutes will only get me around a 10km radius. So below are my configuration.
- Select “Parcel” as my menu item type. “Parcel” are for small size items such as gift box, toys, supplements, cosmetic or fashion. Where else “Packages” are for large size items such as furniture, vehicle parts. If you are selling both small and large size items, please select “Packages”
- Select “Malaysia” or whichever is your origin country in Permissible Country. You can select more than one country if you are able to fulfill export demand.
- Setup your estimated packing time. Packing time is used to provide an estimated delivery time for your customer. For example, if the delivery journey takes 15 minutes and you have placed 15 minutes as your estimated packing time, the system will advise at least a minimum 15 minutes waiting time whenever your customer attempt to make an order.
- Set “NDD” as your logistic type. Instant deliveries are any order which must be delivered under 2 hours. Whilst SDD (Same Day Delivery) is anything between 3-23 hours. NDD (Next Day Delivery) is for any delivery that occurs after 24 hours. Typically most e-commerce will select NDD to keep the delivery charges low and affordable.
Select which party will bear the delivery fee according to your business needs. Select Merchant if you are paying for delivery charges, otherwise select Customer if your customer is paying for the delivery charges.
5. Configure for pickup from my shop #
Pre-requisite for pickup service #
- Shop’s Address added to your Shop Setting.
- Sufficient Peasy account’s credit balance.
- Turn on the “Customer Pickup” function in Shop Setting. Click the left side toggle until toggle turns purple.
Pickup service set up: #
Let’s just say my shop is in Klang, and I have a lot of regular customers who come all the way from Kuala Selangor. The distance between these two locations is roughly 50 km. Based on the traffic around Klang, it will take approximately 60 minutes to reach customers in Kuala Selangor. So below are my configuration. I would then set 50,000 meters in the Maximum Service Radius text field
6. Set up customer's payment for their order from my shop #
How to set up SST function? #
If my shop has SST charges, I need to click on the toggle to activate the function. The toggle will change to purple once activated.
How to request payment before accepting order? #
This toggle is not available for click or activation until I have set up my payment gateway.
Click here to learn how to create and connect your payment gateway on Peasy Sales platform.
7. Set up the business operation hours for my online shop #
If my shop operate 24 hour, configure the system for Mon-Sun 00:00 to 23:59.
Click on “+Add Business Hours” to add more rows for the business hours data.
Otherwise, if my operate only from breakfast to lunch from Mon-Fri, change the time by clicking on each column separately.
Click here to learn more how to set your business operation hours.
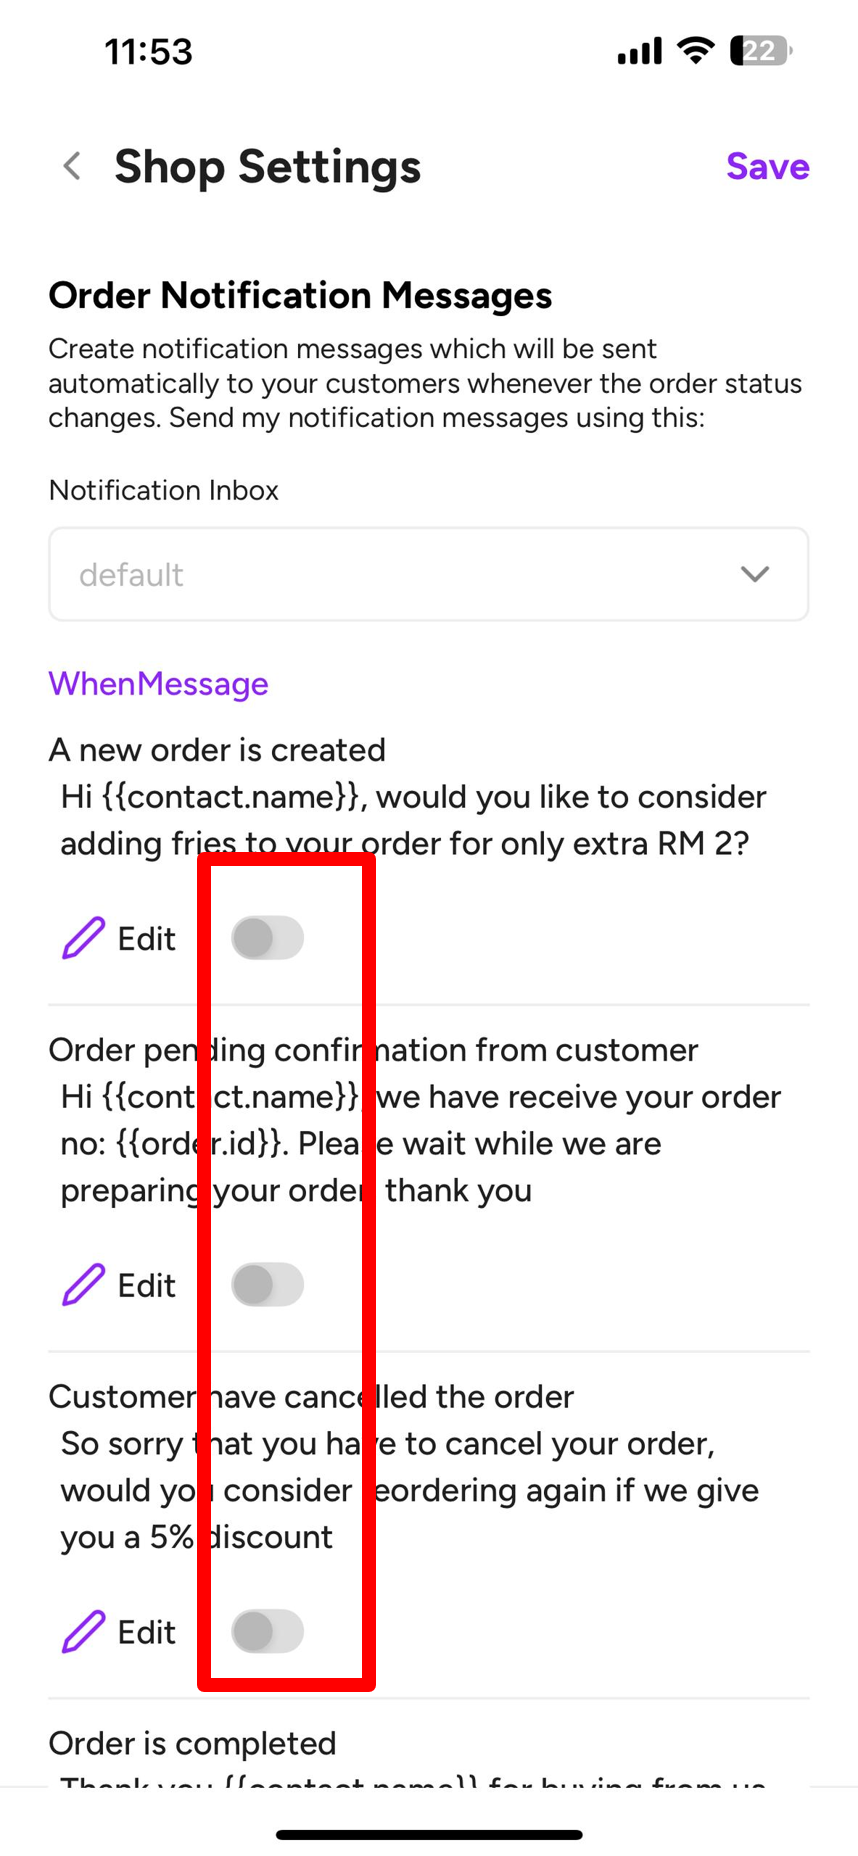
8. Configure my order status notification message #
If I am operating delivery service, I need to keep everything on. If I am only accepting pickup, I can turn off the order status notification message for delivery services
Peasy will have 2 types of order status notification:
- The buyer’s browser audio notification (free)
- Order notification status message via whatsapp is (payable-deducted from Peasy Sales credit balance)
Click on the toggle on the right hand-side of the “Edit” button to activate/deactivate. The toggle turns purple when activated. The screen review as below.
How to check your shop setting? #
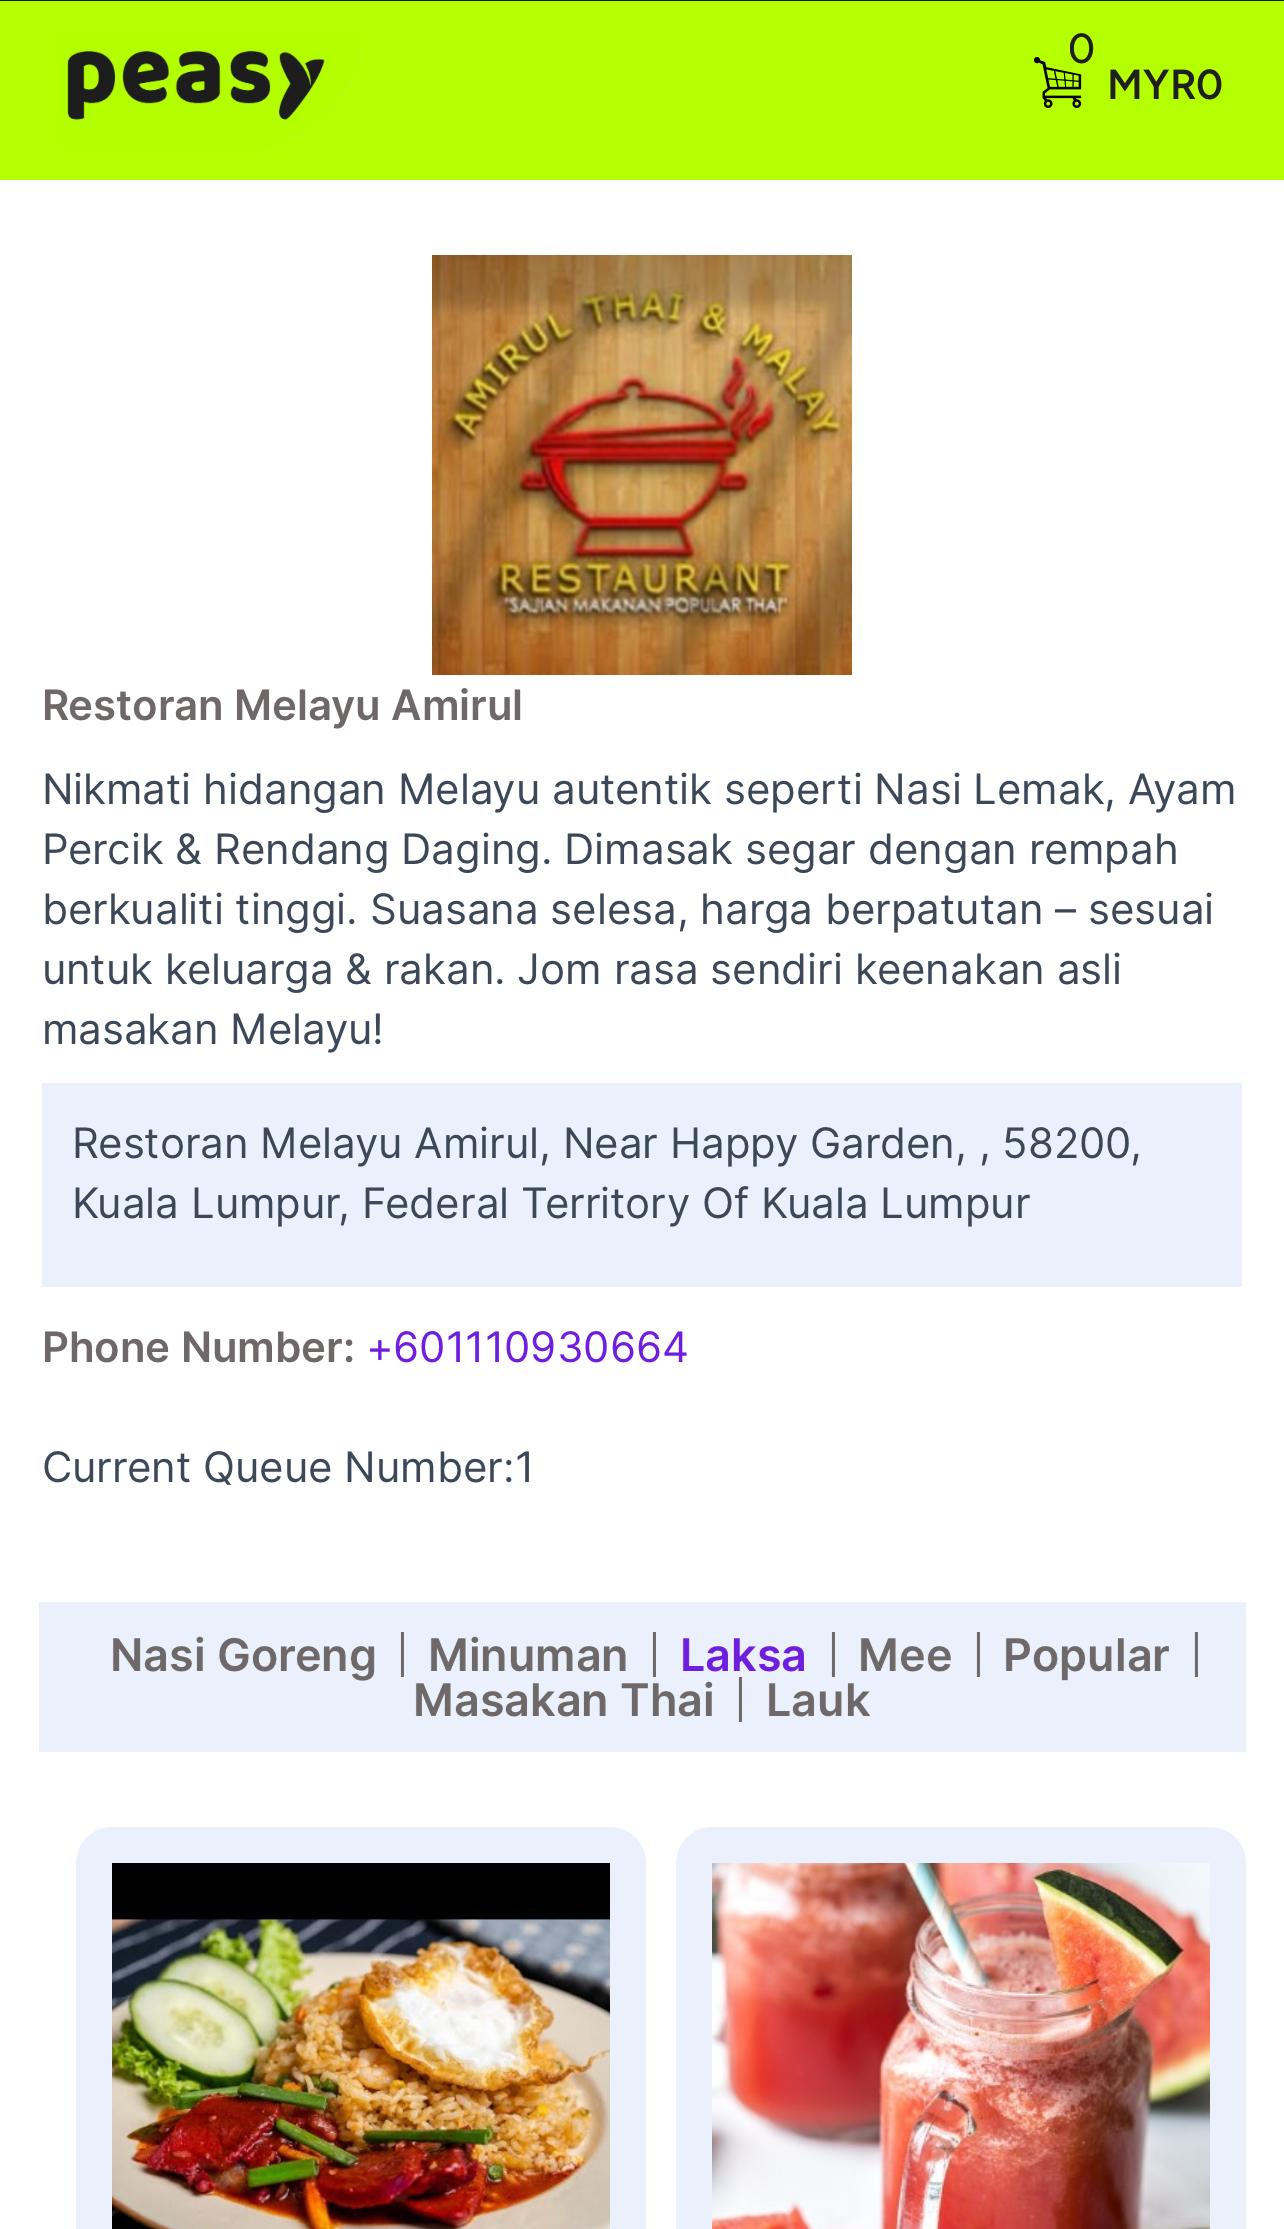
Once you have completed your shop setting, click “Save” at the top-right corner of your screen. Your screen will change as below. Click “Show My Store”.

Your browser will open to show your online store. You have successfully completed shop setting once you see the online menu details below are similar to your input on shop setting.
- Shop logo
- Company name
- Description
- Address
- Phone number
You can also test out the online store by creating your first order. You will noticed the system will only allow orders within your set business hours.
In the case you are allowing delivery services in your shop setting, you can see the options for delivery charges when you order as a Customer on the online shop.